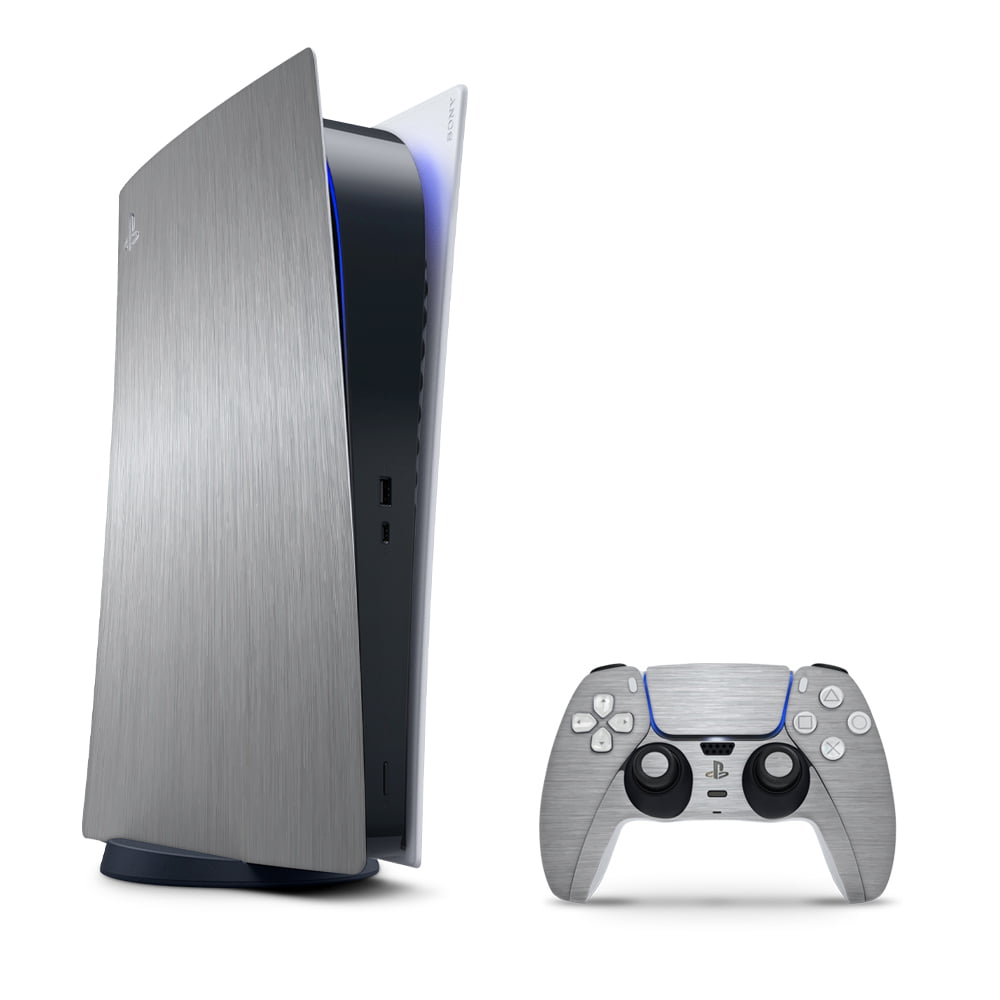
SkinNit Decal Skin For PS5 Digital (No Disk): Brushed Steel (Textured)

R542.00
- Proudly South African and backed by our promise to you
- Thin and tough – protects from minor scratches
- Eazy On, bubble free installation and Peazy off no sticky residue removal
- Ships within 2 to 3 working days
- Description
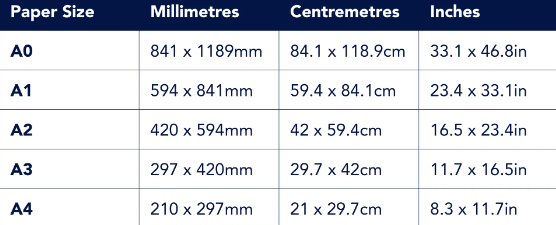
- Size Guide
- Additional information
- Store Policies
- Enquiries
Description
NB! There are 2 different versions of the Playstation 5. This PS5 Digital Edition Console (No Disk) will not fit the PS5 Decal Skin (Standard Edition with Disk). Also, please don’t confuse these skins with the PS4 standard, PS4 Slim, and the PS4 Pro Consoles. Make sure you purchase the correct skin for the type of console you own, if you are not sure of your device model and or if you have any quality issues with your skin please contact the SkinNIt support team.
Our Metallic Texture Range is a premium quality cast vinyl film. Bring your design to the next level with sharp, eye-popping Metallic textures. The adhesive with patented Easy Apply technology allows faster positioning and air-bubble free film application, as well as long term removability after the intended period of use.
Key features
Premium look. Immediate impact.
Brushed metal textured and super conformable film
Excellent 3D conformability on concave and convex shapes including rivets and deep channels
Easy- Apply functionality helps eliminate bubbles and wrinkles
Easy to remove, even over the long term
SkinNIt the easiest way to protect and style your PS5 Standard Edtion (Disk Version) Console:
Specifications:
– Covers complete console & 1 x controller
– Thin and tough protects from minor scratches
– Easy, bubble-free installation and sticky free removal
– No Cutting required
What is a skin?
Think of a skin as a kind of Armor for your device. Not only will it protect your device from scratches, but it will also make your device stand out and reflect your personality. Don’t be like the rest of the crowd and own a boring standard device. SkinNIt and stand out like never before!
Why skin your device with SkinNIt?
OUR SKINS ARE STRONG
SkinNIt skins are made from premium vehicle grade vinyl. The same vinyl they use on cars. The Vinyl is then protected with a cold lamination film that comes in a Matt or Gloss finish depending on material availability. Our skins are super strong will stand the test of time.
APPLYING YOUR SKIN
SkinNIt skins have a special no bubble, no residue adhesive back making them easy to apply. If you can apply a sticker to a sticker book, then you can apply a SkinNIt Skin. It’s really that simple! Ez Pz (Easy Peazy)
REMOVING YOUR SKIN
The only reason you would want to do this is so you can change the design of your skin. We at CC Entertainment can’t think of another reason why you would want to remove your awesome skin. But yes, removing your SkinNIt skin is simple and we promise no residue will be left behind.
SKIN CUT
SkinNIt skins are super thin and won’t cause any damage or overheating to your device. Our Skins are perfectly cut every time to ensure no air-vents, cable inputs or docking stations are affected in any way.
SkinNIt Step-By-Step Installation Guide:
1. Prep your worktable: You need a flat area. Make sure it’s clean. Avoid any dust, stray hairs and food from last night’s dinner.
2. Prep your hands: Get up and wash your hands with soap and warm water to remove any natural oils and grease from your hands. Dry your hands thoroughly.
3. Prep your device: The surface of your device needs to be clean, so grab your damp towel and wipe your device down to remove any dirt and grit. Do not use any cleaning detergents as they may affect the glue from bonding – only use water.
4. Dry your device: Using your dry towel, make sure there’s no water left on your device. Let it sit for a few minutes to make sure any leftover water has evaporated.
5. Get the skin ready: Our skins bond via heat activation you can use a hairdryer to warm the skin and the console surface before applying this is especially necessary in the colder winter season. The idea is not to overheat or burn the skin it is to get the surface area warm and the skin warm before applying. Leave a safe distance between the hairdryer and the skin when doing this process.
6. Using your safety pin or paperclip, carefully remove any cut-outs of the skin. We’ve found it’s best to do this while the skin is still on the backing.
7. Peel & Apply: Now you can gently peel your skin off its backing and apply it to your device. Start at one edge and use the other edges as a guide to get your skin perfectly lined up. Take your time. If you come across any air bubbles or wrinkles during the process, gently run your finger over them and the channelled adhesive will allow the bubbles to be pressed out. Pressure will help bond your skin so be sure to push down hard on all areas especially on the corners to ensure your skin has bonded correctly.
8. Our skins are heat activated so to ensure a strong bond once the skin is applied using a hairdryer to heat activate the skin then rub your fingers across the console for a few minutes to ensure a strong bond. Remember do not burn the skin just apply heat to warm the area where you will be pushing down the skin.
9. You’re done! You’ve just installed your first custom skin. Now go show off your newly skinned device to the world!
***Physical Console and Controllers not included.
Additional information
| Device |
|---|
General Enquiries
There are no enquiries yet.